Required to Start using Journeys
To start using Journeys, you must first have initialized the ByteBrew SDK and integrated custom events in your game.
Creating Journeys
When building Journeys on the dashboard, you have several options for examining your player's user journey through your game. See below sections on how to create Journeys using your game's custom events.
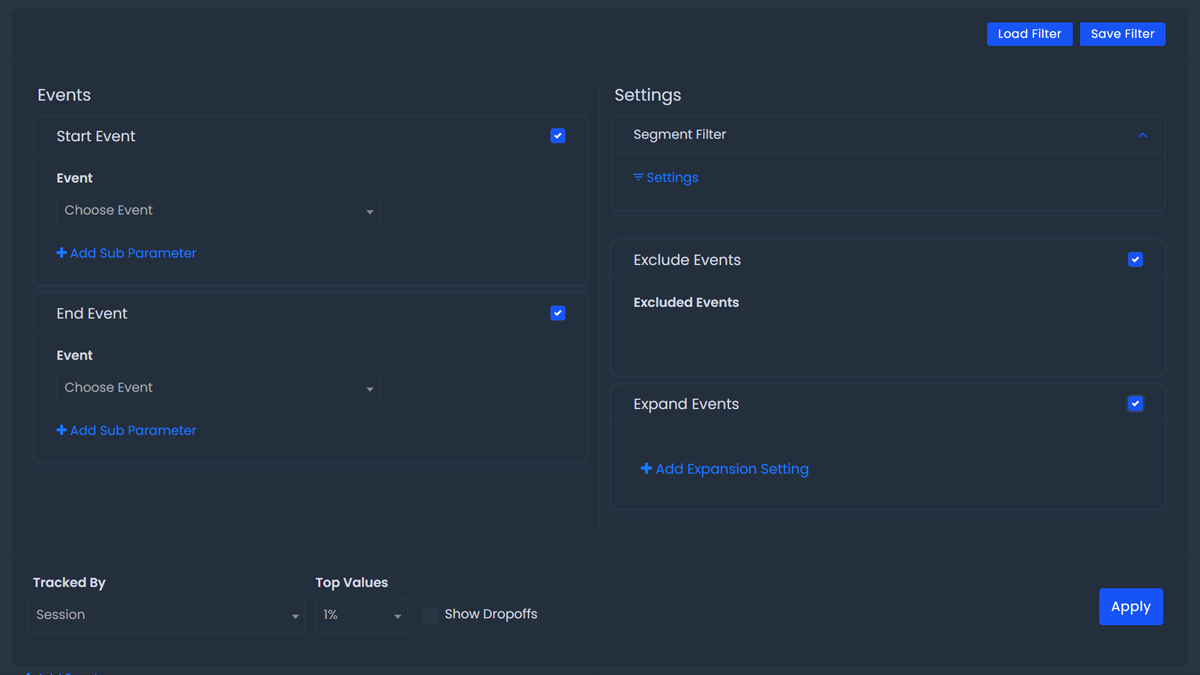
Setting Up Events
To start building a Journey, you must first set up the event's on the Journey dashboard you want to visually analyze. Under the Events column of Journey's settings, you can add a Start Event AND/OR an End Event to build your Journey. Follow steps below to learn how to setup start and end events for your Journey:
Start Event:
Click the Start Event checkbox to enable a Start Event.
After enabling Start Events, then choose the Start Event you'd like to use in your Journey using the Event dropdown.
Optional:Add a subparameter to your subparameter that you'd like the system to filter your event by when building your Journey.
End Event:
Click the End Event checkbox to enable an End Event.
After enabling End Events, then choose the End Event you'd like to use in your Journey using the Event dropdown.
Optional:Add a subparameter to your subparameter that you'd like the system to filter your event by when building your Journey.
Adding Segments
After setting up your events for your Journey, you can create a user segment to refine what users you want the Journey to be filtered by. See steps below on how to setup your Segments in Journeys:
Click the "Settings" Button to top the Segment settings panel.
Select the filters you'd like to apply to the segment.
Exclude Events
When you're creating a user Journey, you have the option to exlcude events in the query's analysis. Excluding an event will remove it from being visualized in the Journey chart paths. This can be a useful function when you want to clean up your user journey to see a refined series of paths. See steps below to learn how to exclude an event:
Click the Exclude Event checkbox to enable excluding events.
After enabling, choose the event(s) you'd like to exclude from your user Journey using the dropdown. You can exclude multiple events from your Journey by selecting multiple events in the Exclude Events dropdown.
Expand Events
Another option you have when building your user Journey is expanding events in your user paths. Expanding an event will drill into the event's values by the dimension you select.
Click the Expand Event checkbox to enable event expansion.
After enabling, start selecting events to expand by selecting "Add Expansion Setting".
Using the dropdown, select the event you want to Expand.
After choosing the event to expand, click "Expand By" and select how you'd like to expand the event. See below for list of options to Expand By:
Tracked By
Once you've setup your events and journey settings you can determine the user purview you'd like to track. You have two options: 1. Session, 2. Lifetime. See how each option is defined below:
Session:
Tracking by a user's session will limit how the user journey is built to examine only within a user's individual game session. This is a great way to get a more micro view at a user's path.
Lifetime:
Tracking by a user's lifetime will show the user journey across user's gameplay sessions in your game. This is will show a more grand macros scale of your user's path spreading across all their sessions.
Top Values
One of the last steps in building a Journey is selecting the percentile of paths you want the query to analyze. In the Top Values dropdown you can select from a range of percentages (%). By selecting a value such as "1%", you are asking the system to only show the top 1% most popular user paths that your players follow. This means that the query will find the absolute most common paths that users take while traveling through your Events setup. If you choose the option for "20%", then you're examining a wider range of paths that are much less popular.
Show Dropoffs
Showing Dropoffs in your journey will add Dropoff paths to your Journey's chart output. To enable this setting, just click the Show Dropoff checkbox.
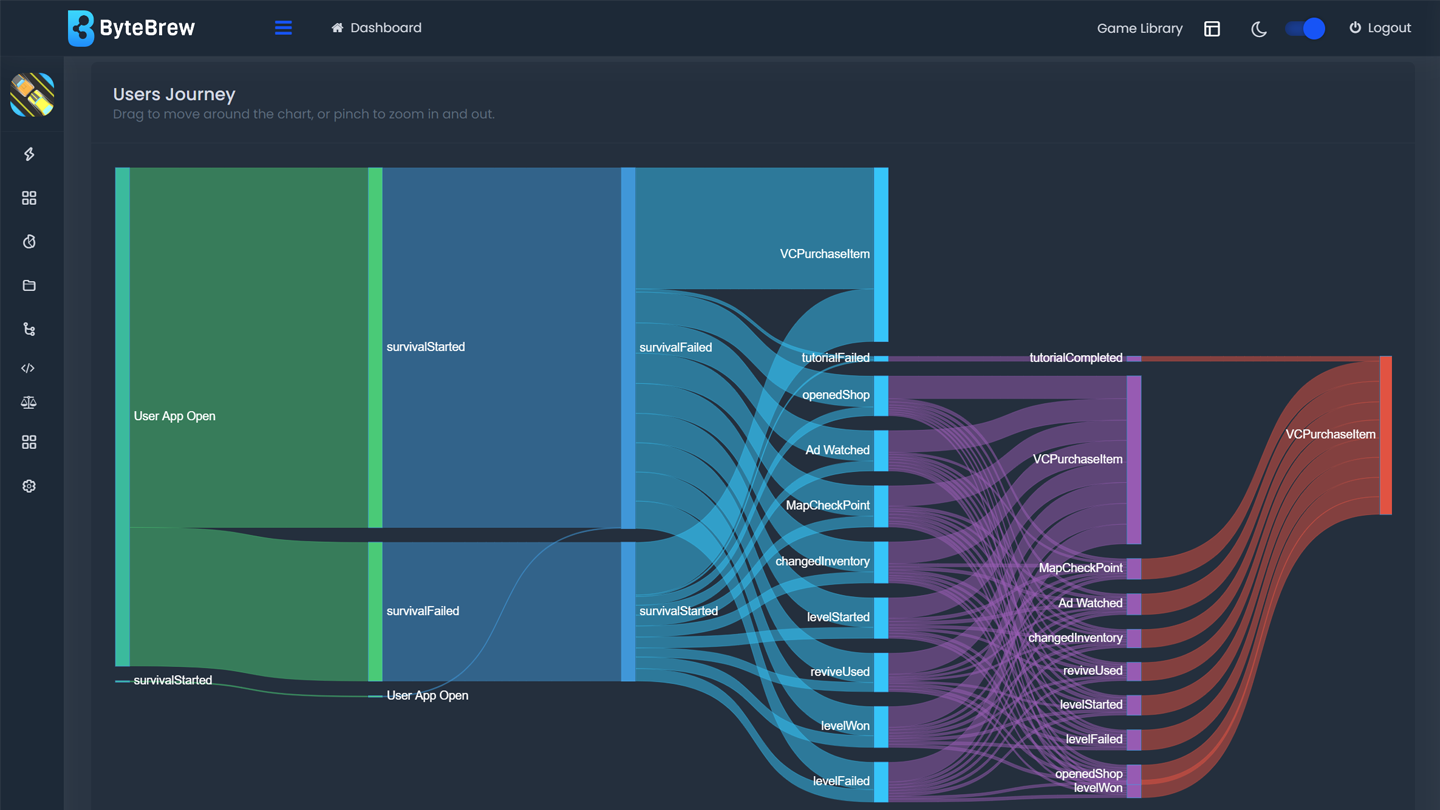
Journey Chart
Journeys creates an interactive Sankey diagram. By hovering over the diagram will show you information about the user paths. See below sections for the list of info given while hovering on the Journey chart.
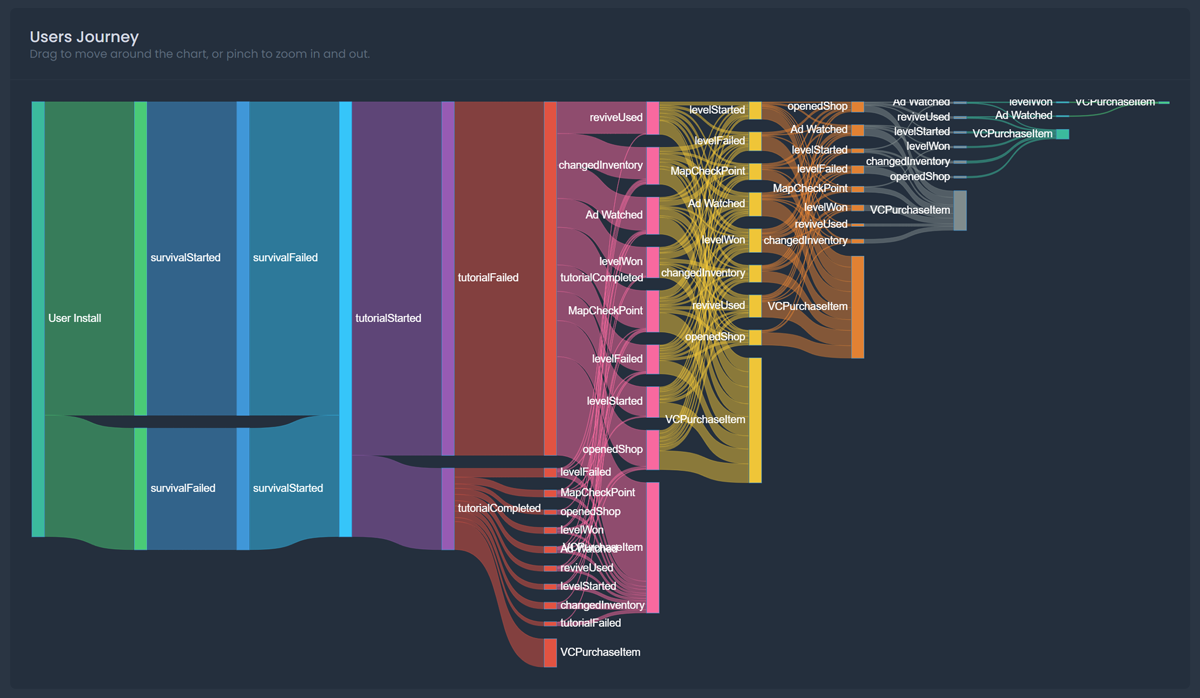
Journey Chart Hovers
| Path Count | Number count of times users in the Journey have traveled through the path stage. |
|---|---|
| Users | Number of total users in the Journey have traveled through the path stage. |
| Transitioned Percentage | The percentage of users who have traveled from the previous stage to the current stage in the user path. This percentage value only takes into account the percentage of users based on the stage before it, not all previous stages from the start of the journey. |
Chart Controls
The Journeys chart diagram is interactable with user controls. See list of controls below:
| Drag | Click and drag anywhere on the diagram to move it. |
|---|---|
| Zoom In | Pinch in your trackpad or scroll in with a mouse to zoom into the diagram. |
| Zoom Out | Pinch outwards your trackpad or scroll out with a mouse to zoom out the diagram. |
Saving Journeys
After building your journey, you have the option to save it; so you don't need to re-build the same query each time. Follow the steps below to save a Journey:
After creating your Journey, open the Save Filters panel by clicking the "Save Filters" button.
Type the name of the filter you're saving to remember what the filter you built.
Loading Journeys
Any Journey you save can be reloaded later into the Journey dashboard by clicking the "Load Filters" button to open the Load Filters panel. See the options list below the Load Filter panel:
FAQs
This metric shows, the percentage of users who have traveled from the previous stage to the current stage. It does not show the percentage of users who have traveled through this path from the start of the Journey.
If you set up both a Start Event and an End event, then you will not see user Dropoffs populate in the Journey chart.
Top Values is the percentile of paths that you want the system to search for. The smaller the percentage, the more popular the paths will be used to analyze. Ex. 1% Top Values will show only the absolute most common user paths taken by players based on your event setup. 20% Top Values will include less common user paths with a wider view of paths.
The most common reason this happens is that you've expanded an event that is used as a Start or End Event in your Journey query. Events that are used as a Start or End event are not able to be expanded.
Not currently, however, you can always take a screenshot to save as an image for later.