Unity SDK Integration
Watch Video play_circleFollow the steps below to integrate the ByteBrew SDK or watch the tutorial video for a step by step walkthrough:
Import ByteBrew SDK
Import ByteBrew Unity SDK to your project.
(Android Only) If you don't use Auto-Resolve on your External Dependency Manager, then after importing the SDK, go to Assets, find External Dependency Manager, select Android Resolver, and click Force Resolve.
Create ByteBrew Object
Create the ByteBrew GameObject by following the steps below:
Go to Window
Select ByteBrew
Choose "Create ByteBrew GameObject". Make sure to place GameObject in your first scene.
Enable Platforms
To enable platforms:
Go to Window
Select ByteBrew
Choose "Select ByteBrew settings"
Enable which platforms (iOS, Android and Web) you want to track on the Unity ByteBrew settings inspector panel.
Go to your ByteBrew Dashboard
Go to your Game Settings page on the ByteBrew dashboard and locate your game keys listed on the dashboard. After finding your Game IDs and SDK Key, copy them.
Input Game Keys and SDK Key into Unity
Now that you've located your Game IDs and SDK Key, input the platform specific Game IDs and SDK Key from your game on the ByteBrew dashboard into the Unity ByteBrew settings inspector panel.
Initialize ByteBrew
After inputing your Game IDs and SDK Key, initialize ByteBrew using the code below at the beginning of your game to start capturing sessions and events:
                                // Initialize ByteBrew and ByteBrew Ads
                                ByteBrew.InitializeByteBrew();
                                ByteBrewAds.InitializeAds();
iOS Only (Optional) - Call ByteBrew's App Tracking Transparency (ATT) wrapper
ByteBrew offers our own ATT Handler, so you do not have to call native code in your unity application.
If you use our ATT Handler, you must do the following in your info.plist:
Use the Xcode Property List Editor to add: Privacy - Tracking Usage Description.
In the value string field enter a sentence or statement for the reason behind you tracking request.
                                // Call ByteBrew ATT Wrapper
                                ByteBrew.requestForAppTrackingTransparency((status) =>
                                {
                                    //Case 0: ATTrackingManagerAuthorizationStatusAuthorized
                                    //Case 1: ATTrackingManagerAuthorizationStatusDenied
                                    //Case 2: ATTrackingManagerAuthorizationStatusRestricted
                                    //Case 3: ATTrackingManagerAuthorizationStatusNotDetermined
                                    Debug.Log("ByteBrew Got a status of: " + status);
                                    ByteBrew.InitializeByteBrew();
                                    ByteBrewAds.InitializeAds();
                                });
Exporting iOS Requirements
To export for iOS, ByteBrew requires the following three (3) iOS Frameworks:
Security.Framework
AdServices.Framework
AdSupport.Framework
Each of these listed frameworks should be implemented in your final xcode project as frameworks.
Setup Ads
smartphoneMobile OnlyThe ByteBrew SDK supports both Interstitial and Rewarded in-app ads.
Interstitial ads are full screen skippable video advertisements you can show in your app. Interstitial ads are typically shown during natural pauses in your app or game.
Rewarded ads are full screen, non-skippable video advertisements that provide a "rewarded" callback to deliver an in-app reward after the ad is completed. Rewarded ads are typically offered users an in-app reward in exchange for their engagement during the ad duration.
Set Up Ads Listeners
The following shows the ad event listeners and method signatures you can utilize. It's recommended to setup guards to prevent subscribing multiple times to listeners.
                                // Init
                                ByteBrewAds.OnAdsInitSuccess += OnAdsInitSuccess;
                                ByteBrewAds.OnAdsInitFailure += OnAdsInitFailed;

                                // Interstitial

                                // Load
                                ByteBrewAds.OnInterstitialAdLoaded += OnInterstitialAdLoaded;
                                ByteBrewAds.OnInterstitialAdLoadError += OnInterstitialAdLoadError;
                                // Events
                                ByteBrewAds.OnInterstitialAdStarted += OnInterstitialAdStarted;
                                ByteBrewAds.OnInterstitialAdClicked += OnInterstitialAdClicked;
                                ByteBrewAds.OnInterstitialAdCompleted += OnInterstitialAdCompleted;
                                ByteBrewAds.OnInterstitialAdDismissed += OnInterstitialAdDismissed;
                                ByteBrewAds.OnInterstitialAdError += OnInterstitialAdError;


                                // Rewarded

                                // Load
                                ByteBrewAds.OnRewardedAdLoaded += OnRewardedAdLoaded;
                                ByteBrewAds.OnRewardedAdLoadError += OnRewardedAdLoadError;
                                // Events
                                ByteBrewAds.OnRewardedAdStarted += OnRewardedAdStarted;
                                ByteBrewAds.OnRewardedAdClicked += OnRewardedAdClicked;
                                ByteBrewAds.OnRewardedAdCompleted += OnRewardedAdCompleted;
                                ByteBrewAds.OnRewardedAdRewarded += OnRewardedAdRewarded;
                                ByteBrewAds.OnRewardedAdDismissed += OnRewardedAdDismissed;
                                ByteBrewAds.OnRewardedAdError += OnRewardedAdError;
                                // Method Signatures
                                private static void OnAdsInitSuccess() {
                                    // We can now start loading ads (See next section for more details)
                                    ByteBrewAds.LoadInterstitialCrossPromoAd(_BBInterstitialAdUnitId, true);
                                    ByteBrewAds.LoadInterstitialCrossPromoAd(_BBInterstitialAdUnitId);
                                    ByteBrewAds.LoadRewardedCrossPromoAd(_BBRewardedAdUnitId, true);
                                    ByteBrewAds.LoadRewardedCrossPromoAd(_BBRewardedAdUnitId);
                                }

                                private static void OnAdsInitFailed() {}

                                // Interstitial
                                private static void OnInterstitialAdLoaded(ByteBrewAdDataCommon adData) {}
                                private static void OnInterstitialAdLoadError(string error, ByteBrewAdDataCommon adData) {}
                                private static void OnInterstitialAdStarted(ByteBrewAdDataCommon adData) {}
                                private static void OnInterstitialAdClicked(ByteBrewAdDataCommon adData) {}
                                private static void OnInterstitialAdCompleted(ByteBrewAdDataCommon adData) {}
                                private static void OnInterstitialAdDismissed(ByteBrewAdDataCommon adData) {}
                                private static void OnInterstitialAdError(string error, ByteBrewAdDataCommon adData) {}

                                // Rewarded
                                private static void OnRewardedAdLoaded(ByteBrewAdDataCommon adData) {}
                                private static void OnRewardedAdLoadError(string error, ByteBrewAdDataCommon adData) {}
                                private static void OnRewardedAdStarted(ByteBrewAdDataCommon adData) {}
                                private static void OnRewardedAdClicked(ByteBrewAdDataCommon adData) {}
                                private static void OnRewardedAdCompleted(ByteBrewAdDataCommon adData) {}
                                private static void OnRewardedAdRewarded(ByteBrewAdDataCommon adData) {}
                                private static void OnRewardedAdDismissed(ByteBrewAdDataCommon adData) {}
                                private static void OnRewardedAdError(string error, ByteBrewAdDataCommon adData) {}
Loading Ads
Ads are loaded by ad unit ID. The methods also optionally take a boolean to indicate whether or not the ad should be CTRL only or not.
false. Interstitial Ads
Load an interstitial ad by calling:
                                ByteBrewAds.LoadInterstitialCrossPromoAd(_BBInterstitialAdUnitId);

                                //This is a specific call to only load a Ctrl targetted ad campaign. Ctrl excludes App Install campaign types.
                                ByteBrewAds.LoadInterstitialCrossPromoAd(_BBInterstitialAdUnitId, ctrlOnly: true);
Rewarded Ads
Load a rewarded ad by calling:
                                ByteBrewAds.LoadRewardedCrossPromoAd(_BBRewardedAdUnitId);

                                //This is a specific call to only load a Ctrl targetted ad campaign. Ctrl excludes App Install campaign types.
                                ByteBrewAds.LoadRewardedCrossPromoAd(_BBRewardedAdUnitId, ctrlOnly: true);
Showing Ads
Once an ad is loaded, you can show it by calling the appropriate Show method with the ad unit ID.
false. Interstitial Ads
                                //**Check & Call Interstitial Ad**
                                //Check for Interstitial Ad
                                ByteBrewAds.IsCrossPromoAdLoaded(_BBInterstitialAdUnitId);

                                //Show Interstitial Ad
                                ByteBrewAds.ShowInterstitialCrossPromoAd(_BBInterstitialAdUnitId);


                                //**Check & Call Interstitial Ctrl Ad**
                                //Check for Interstitial Ctrl Ad
                                ByteBrewAds.IsCrossPromoAdLoaded(_BBInterstitialAdUnitId, ctrlOnly: true);

                                //Show Interstitial Ctrl Ad
                                ByteBrewAds.ShowInterstitialCrossPromoAd(_BBInterstitialAdUnitId, ctrlOnly: true);
Rewarded Ads
                                //**Check & Call Rewarded Ad**
                                //Check for Rewarded Ad
                                ByteBrewAds.IsCrossPromoAdLoaded(_BBRewardedAdUnitId);

                                //Show for Rewarded Ad
                                ByteBrewAds.ShowRewardedCrossPromoAd(_BBRewardedAdUnitId);


                                //**Check & Call Rewarded Ctrl Ad**
                                //Check for Rewarded Ctrl Ad
                                ByteBrewAds.IsCrossPromoAdLoaded(_BBRewardedAdUnitId, ctrlOnly: true);

                                //Show Rewarded Ctrl Ad
                                ByteBrewAds.ShowRewardedCrossPromoAd(_BBRewardedAdUnitId, ctrlOnly: true);
Recommended Ad Setup
To capture both high-value users and also fill empty ad space, you can setup your ad implementation using the following structures:
Interstitial Ads
                                //Call Ctrl targetted ad to capture high-value users
                                if (ByteBrewAds.IsCrossPromoAdLoaded(_BBInterstitialAdUnitId, ctrlOnly: true))
                                {
                                    ByteBrewAds.ShowInterstitialCrossPromoAd(_BBInterstitialAdUnitId, ctrlOnly: true);
                                }
                                else if(YOUR_MONETIZATION_PARTNER_STATUS)
                                {
                                    //SHOW YOUR MONETIZATION PARTNER
                                }
                                else if (ByteBrewAds.IsCrossPromoAdLoaded(_BBInterstitialAdUnitId)) //Check and show an ad
                                {
                                    //Call to fill empty ad space
                                    ByteBrewAds.ShowInterstitialCrossPromoAd(_BBInterstitialAdUnitId);
                                }
Rewarded Ads
                                //Call Ctrl targetted ad to capture high-value users
                                if (ByteBrewAds.IsCrossPromoAdLoaded(_BBRewardedAdUnitId, ctrlOnly: true))
                                {
                                    ByteBrewAds.ShowRewardedCrossPromoAd(_BBRewardedAdUnitId, ctrlOnly: true);
                                }
                                else if(YOUR_MONETIZATION_PARTNER_STATUS)
                                {
                                    //SHOW YOUR MONETIZATION PARTNER
                                }
                                else if (ByteBrewAds.IsCrossPromoAdLoaded(_BBRewardedAdUnitId)) //Check and show an ad
                                {
                                    //Call to fill empty ad space
                                    ByteBrewAds.ShowRewardedCrossPromoAd(_BBRewardedAdUnitId);
                                }
Ad Initialization Status
You can check if the ads system is initialized by calling ByteBrewAds.IsAdsInitialized():
bool adsInitialized = ByteBrewAds.IsAdsInitialized();
Custom Events Tracking
Watch Video play_circleCustom Events in ByteBrew enable you to deep dive across all of our extensive analytics dashboards. Continue below to learn how to integrate custom events.
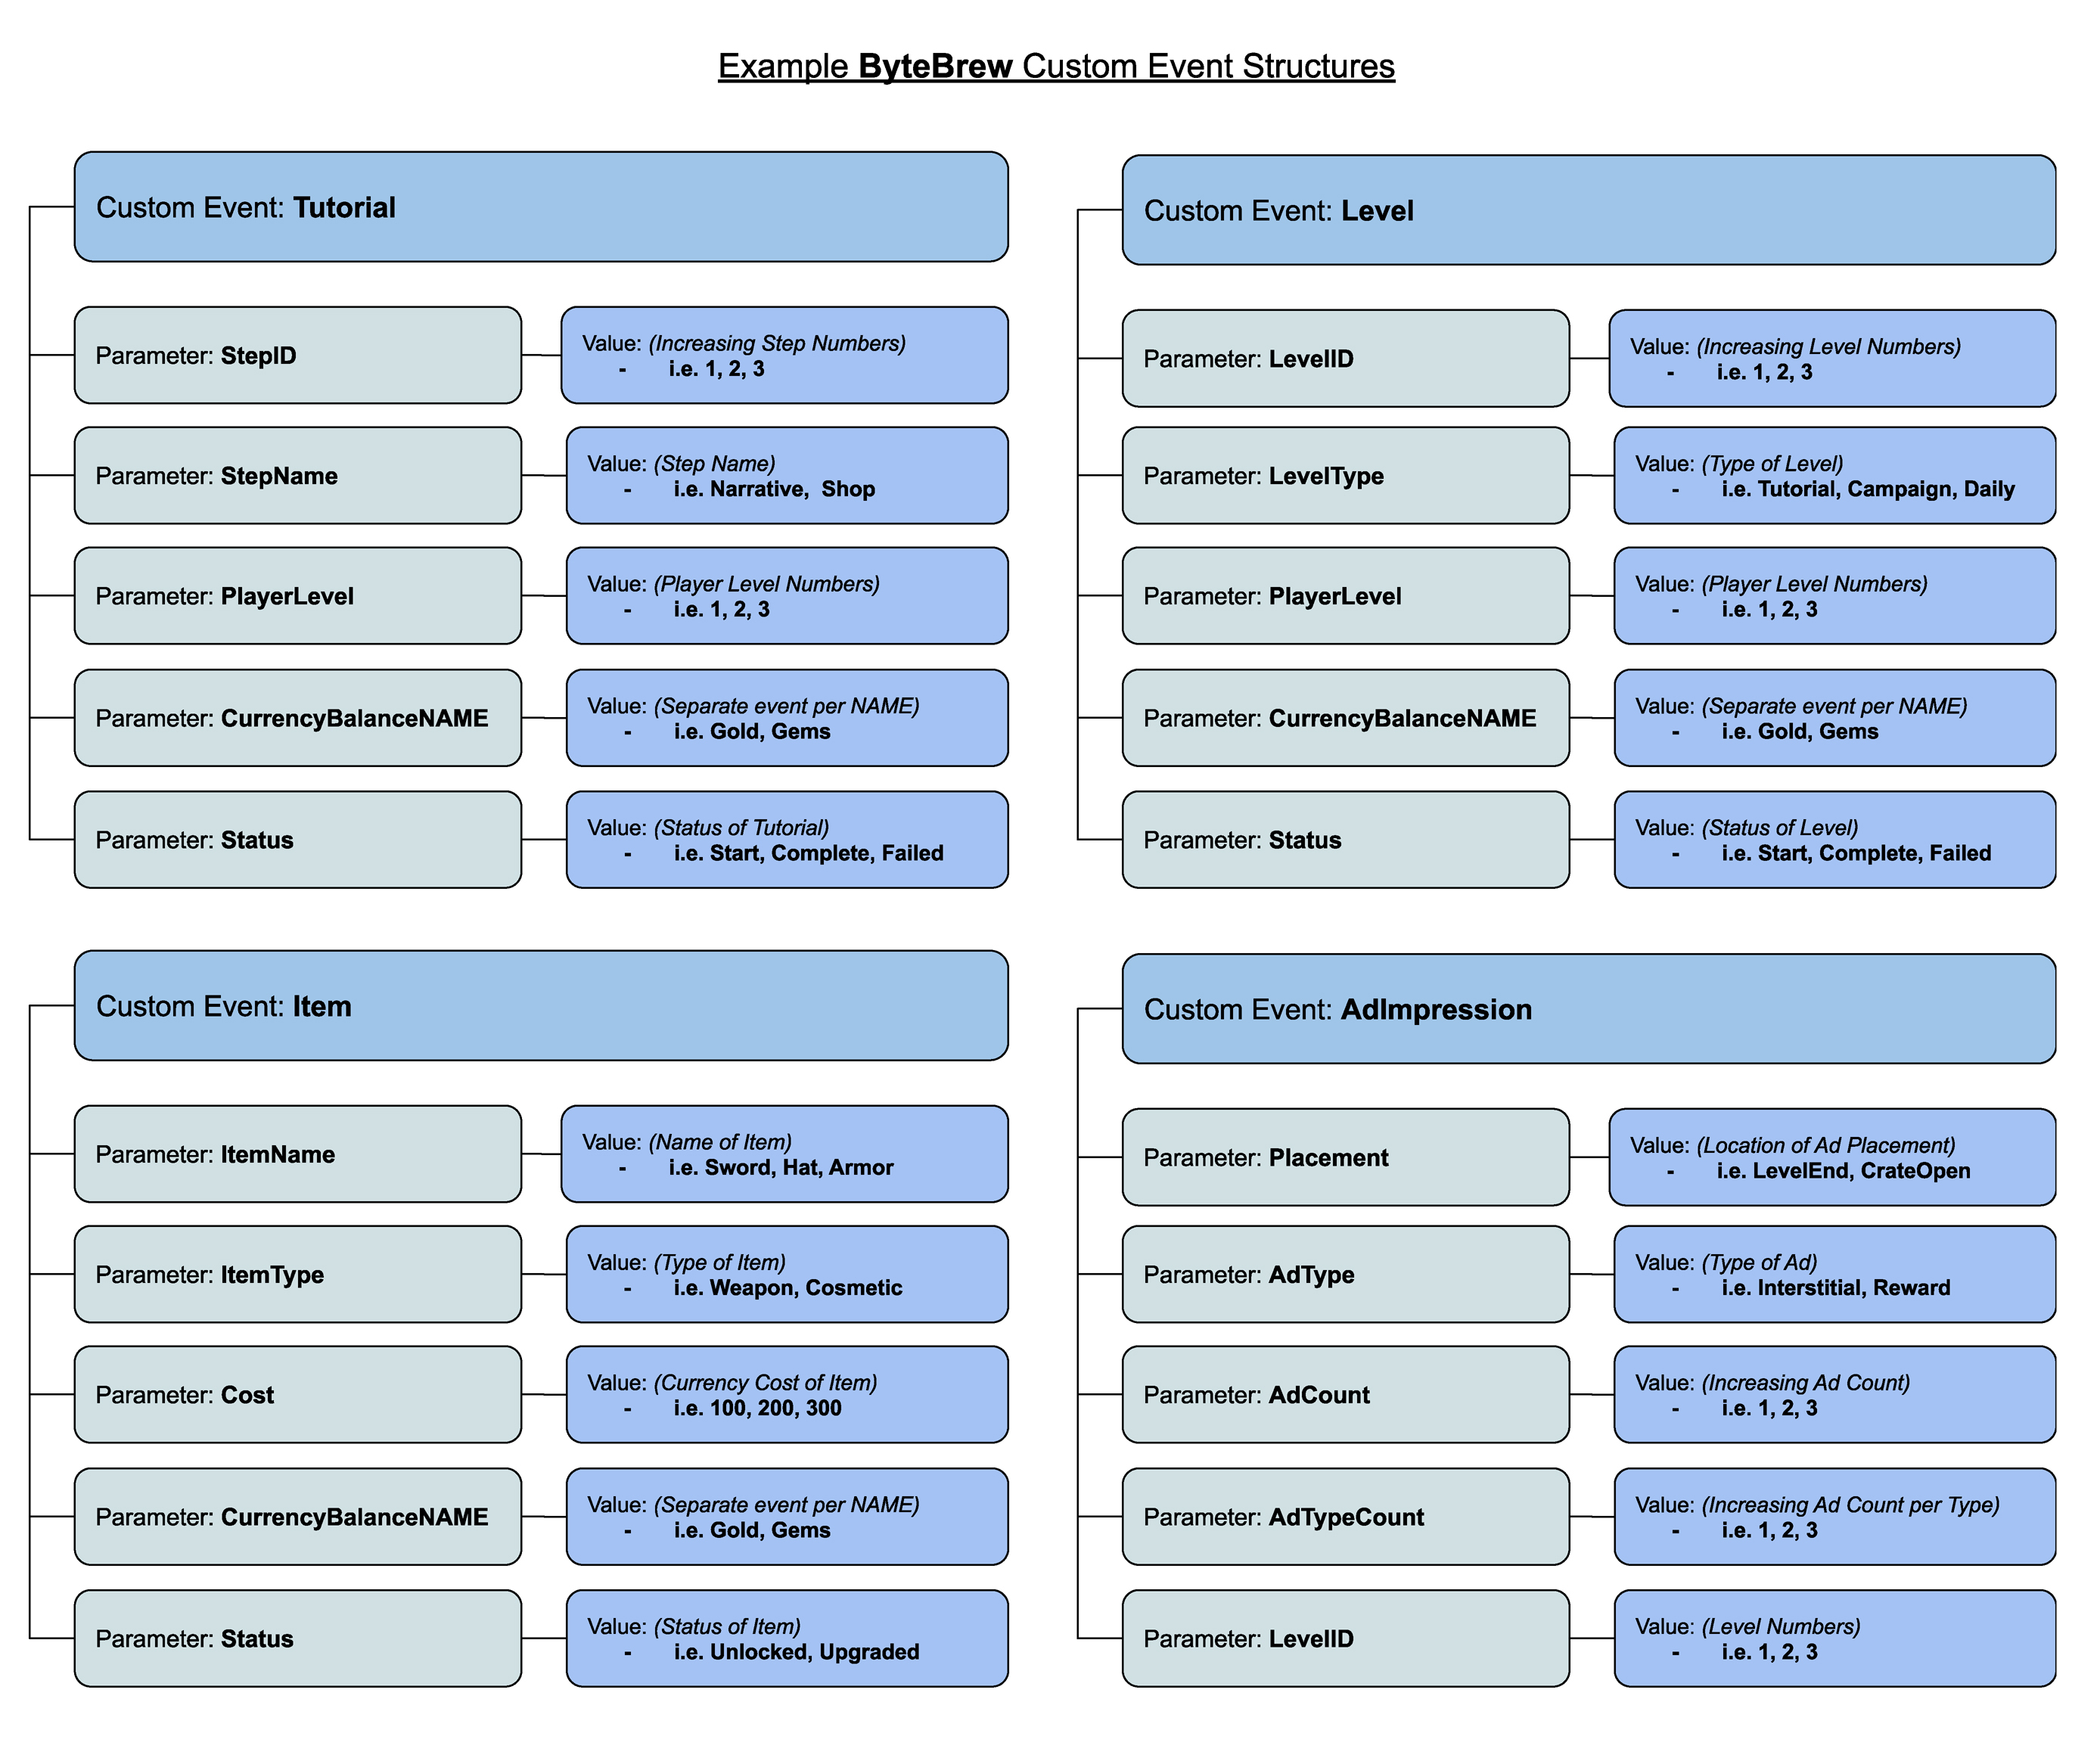
Custom Events on ByteBrew allow for an unlimited number of key_name=value; sub-parameters under the custom event. For example, you can have a custom event called “level” that has a subparameter under the event named “levelnumber” and the values of that Level Number subparameter could be “1, 2, 3, 4, 5, etc.”. Additionally you could add in other subparameters for attributes inside the levels of your game, such as "powerups", to show the different equipment used in levels with parameter values "fireball, revive, doublepoints, etc.". The world is your oyster with custom events, so build as complex of an event system as you need for your game. To illustrate our custom event structure visually, see the following diagram:
Custom Events
See samples below to see how to code Custom Events:
Custom event names and parameters that include special characters will not be processed on the dashboard. These events are unrecognized by ByteBrew and antipattern to ByteBrew's event structure.
Basic Custom Event:
                                    //Basic Custom Event without any sub-parameters
                                    ByteBrew.NewCustomEvent("eventName");
Dictionary Custom Event Tracking Method:
To easily add additional custom sub-parameters to an event you can use the dictionary method below:
                                    //Custom Event Dictionary Example with sub-parameters
                                    var eventParameters = new Dictionary<string, string>()
                                    {
                                        { "key_name", "value" },
                                        { "key_name1", "value1" },
                                        { "key_name2", "value2" },
                                        { "key_name3", "value3" },
                                        { "key_name4", "value4" },
                                        { "key_name5", "value5" }
                                    };
                                    ByteBrew.NewCustomEvent("eventName", eventParameters);

                                    //Example Event
                                    var mapCheckpointParameters = new Dictionary<string, string>()
                                    {
                                        { "earned", "KARMA" },
                                        { "amount", "250" },
                                        { "character", "Hunterwizard" },
                                        { "selectedPowerup", "ExtraArrow" },
                                        { "level", "32" },
                                        { "runDeathCount", "2" }
                                    };
                                    ByteBrew.NewCustomEvent("MapCheckPointHit", mapCheckpointParameters);
Custom Event Tracking Method:
                                    //Custom Event Format with sub-parameters
                                    ByteBrew.NewCustomEvent("eventName", "key_name1=value1;key_name2=value2;key_name3=value3;key_name4=value4;");

                                    //Example Event
                                    ByteBrew.NewCustomEvent("LevelStarted", "level=25;character=AlienSpaceMan;weapon=megablaster;powerup=extralife;");
Remote Configs & A/B Tests
Watch Video play_circleRemote Configs allow you to make updates to your app remotely without having to update your game's app store. Adding remote configs to your games are a fantastic way to be agile and send updates or patches to players instantly. Remote Configs are also utilized for creating A/B Tests on the platform.
When planning to integrate Remote Configs, We recommend implementing remote configs throughout all parts of your game to allow you to tweak and tune as you analyze your game performance data. See how to implement remote configs in your game by watching the tutorial video or following the steps below:
Loading the Remote Configs
To use Remote Configs, you must first call for the config to get updated. You can call the below code whenever you want to update the configs:
                                //Call the Action handler
                                ByteBrew.RemoteConfigsUpdated(() =>
                                {
                                    //Do Whatever you want here once the config is updated
                                });

                                //Check if the remote configs are ready and set
                                ByteBrew.HasRemoteConfigsBeenSet();
Retrieve the Configs
Once the action handler has finished, you can call the remote config method below:
                                //Call to get the key specific value and if the key doesn't exist it will return the default variable specified, like if the AB test user is in the control group
                                ByteBrew.GetRemoteConfigForKey("dailyWeapon", "goldRevolver");
Push Notifications
Watch Video play_circle smartphoneMobile OnlyUsing ByteBrew you can send cross-platform push notifications to your players around the globe. To get started with push notifications follow the steps below or watch the tutorial video series.
Integrate Push Notifications
Integrating Push Notifications with ByteBrew is super simple and only requires one line of code after initializing the ByteBrew SDK. See the Push Notification integration code line below:
ByteBrew.StartPushNotifications();
Create Push Notification App on the ByteBrew Dashboard
Go to the Push Notification dashboard on ByteBrew and create a new Push Notification App. See our Push Notification Dashboard documentation for step by step walkthroughs about this.
Push Notification Android Manifest (Required Android Only)
<uses-permission android:name="android.permission.POST_NOTIFICATIONS"/>
Push Notification Xcode Export Additions (Required iOS Only)
For sending notifications to iOS devices, follow the additional required steps below on Xcode:
Add UserNotifications.framework
Add UserNotifications.framework to the frameworks and libraries in Xcode.
Add Capabilities
Press "+ Capability" and add the following capabilities listed in steps 3 and 4 below.

Add "Background Modes" and under that section, checkmark "Remote Notifications
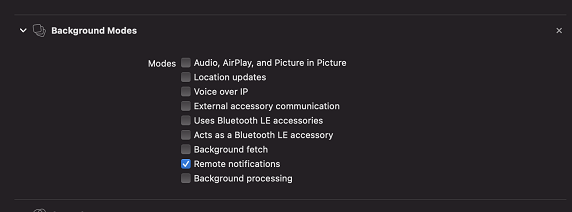
Add "Push Notifications"

Track Purchases
Watch Video play_circle smartphoneMobile OnlyIn ByteBrew SDK you can track all your game or apps in-app purchases to analyze your monetization performance on the dashboard. There are two ways to track purchases on ByteBrew. The first way is to use basic in-app purchase events. The second way is to use our real-time server-side purchase validation to validate real purchases vs. fraudulent transactions. See below to learn how to implement either method or watch our tutorial video.
Track Validated Purchases
On ByteBrew, we offer a real-time server-side purchase validation to stop purchase fraud from client-side purchase receipt tampering that takes place in mobile games and apps. To utilize this validation you have two options: (1) a method with a callback to retrieve if a purchase was valid and (2) a method just to validate purchases without a callback. Follow below sections for code snippets for each function:
Purchase Validation with Callback
To track validated in-app purchases utilize the platform specific method. Using this method will create a purchase callback that will return a payload with the purchases details and verification status. See below for the Return Results and message definitions:
                                //JSON Format ex. string json = "{\"firstname\":\"john\", \"lastname\":\"doe\",\"age\":30}";

                                //Retrieve the iOS receipt from the purchase event that occurs. We will validate it server side so you can view valid purchases in you dashboard.
                                string iosReceipt = "...";
                                ByteBrew.ValidateiOSInAppPurchaseEvent("Apple App Store", "USD", 1.99f, "NoAds", "NoAds", iosReceipt,
                                    purchaseResultData => {
                                        Debug.Log("ByteBrew Purchase Processed: " + purchaseResultData.purchaseProcessed);   //bool telling if the purchase even went to the server to get checked
                                        Debug.Log("ByteBrew Purchase Is Valid: " + purchaseResultData.isValid);              //bool signaling if the purchase is real or fake
                                        Debug.Log("ByteBrew Purchase Message: " + purchaseResultData.message);               //Message from the server telling the explaination behind the decision
                                        Debug.Log("ByteBrew Purchase timestamp: " + purchaseResultData.timestamp);
                                    });

                                //Retrieve the Android receipt and Signature from the purchase event that occurs. We will validate it server side so you can view valid purchases in you dashboard.
                                string googleReceipt = "...";
                                string googleSignature = "...";
                                ByteBrew.ValidateGoogleInAppPurchaseEvent("Google Play Store", "USD", 1.99f, "NoAds", "NoAds", googleReceipt, googleSignature,
                                    purchaseResultData => {
                                        Debug.Log("ByteBrew Purchase Processed: " + purchaseResultData.purchaseProcessed);  //bool telling if the purchase even went to the server to get checked
                                        Debug.Log("ByteBrew Purchase Is Valid: " + purchaseResultData.isValid);             //bool signaling if the purchase is real or fake
                                        Debug.Log("ByteBrew Purchase Message: " + purchaseResultData.message);              //Message from the server telling the explaination behind the decision
                                        Debug.Log("ByteBrew Purchase timestamp: " + purchaseResultData.timestamp);
                                    });
Returned Results:
The following table are the possible returning results:
Returned Results Message:
In addition to the Return Result you will also recieve a message. See below for possible output messages and their definition:
"Validation Successful, real purchase.": This means that the message as a real purchase.
"Validation Failed, fake purchase.": This means that the purchase is fake or fraudulent.
"Error validating receipt, check game configs.": This message means that there might be an issue with the implementation. Check to make sure that the purchaseProcessed boolean is True and go to your game settings on the ByteBrew dashboard to update your Apple App Shared Secret and Google Play License Key.
Purchase Validation without Callback
To track in-app purchases using our validation system without looking for the purchase callback, utilize the platform specific method code snippets below:
                                //JSON Format ex. string json = "{\"firstname\":\"john\", \"lastname\":\"doe\",\"age\":30}";

                                //Retrieve the iOS receipt from the purchase event that occurs. We will validate it server side so you can view valid purchases in you dashboard.
                                string iosReceipt = "...";
                                ByteBrew.TrackiOSInAppPurchaseEvent("Apple App Store", "USD", 5.99f, "currencyPack01", "Currencies", iosReceipt);

                                //Retrieve the Android receipt and Signature from the purchase event that occurs. We will validate it server side so you can view valid purchases in you dashboard.
                                string googleReceipt = "...";
                                string googleSignature = "...";
                                ByteBrew.TrackGoogleInAppPurchaseEvent("Google Play Store", "USD", 5.99f, "currencyPack01", "Currencies", googleReceipt, googleSignature);
Track Basic In-App Purchases
For cases where you are using your own in-app purchase validation, track in-app purchases in your game using the below method:
ByteBrew.TrackInAppPurchaseEvent("Apple App Store", "USD", 5.99f, "currencyPack01", "Currencies");
Ad Tracking Event
smartphoneMobile OnlyUsing ByteBrew you can track your game's or app's ad events. Tracking Ad Events will enable you to see breakdowns of your ads in the monetization dashboard. See the code snippets below to learn how to track ad events:
                                // Record the Placement Type, Provider of the ad, ad unit name, and revenue of the impression
                                ByteBrew.TrackAdEvent(ByteBrewAdTypes.Interstitial, "Google AdMob", "Interstitial_Unit_Name", 0.00074145);
                                ByteBrew.TrackAdEvent(ByteBrewAdTypes.Reward, "Unity Ads", "Reward_Unit_Name", 0.005562);

                                //Add your ad units placement location in your game to breakdown your impression more.
                                ByteBrew.TrackAdEvent(ByteBrewAdTypes.Interstitial, "Google AdMob", "Interstitial_Unit_Name", "Interstitial_EndOfLevel", 0.0024145);
Data Attributes
smartphoneMobile OnlyData Attributes are tags in the SDK that you can give a user to define them for live ops functions. For example, you can use Data Attributes to tag user to build player segments to send targeted remote configs and push notifications. If you are looking to tag users for tracking and filtering, then use Custom Events with subparamters to track that type of update. See the following code snippets for examples on how to use Data Attributes:
                                ByteBrew.SetCustomUserDataAttribute("dundees", 3);
                                ByteBrew.SetCustomUserDataAttribute("loves_the_office", true);
Get User ID
GetUserID method in the SDK enables you to grab the current User ID of the user in your game. This is a handy method for finding the ID for a user you want to send a specific push notification to.
                                // Get the string userID
                                ByteBrew.GetUserID();
Initialization Callback
In the SDK, you can use an initialization callback to get a True/False boolean to determine if ByteBrew SDK has completed the initialization.
ByteBrew.IsByteBrewInitialized();
Stop Tracking Current User
In the ByteBrew SDK, you have the option to stop tracking any user in your game by calling the ByteBrew StopTracking method. This will immediately stop and disable any tracking for a user. As another alternative method to disabling tracking, you can build your own consent pop-up prompt screen in your game or app and delay the initialization of ByteBrew SDK until your user has consented/agreed to your prompt.
ByteBrew.StopTracking();
ProGuard Setup for ByteBrew SDK
smartphoneMobile OnlyIf you have ProGuard or Minify enabled in your game, add the following to your "proguard-user.txt" file.
-keep class com.bytebrew.** {*; }
Updating ByteBrew SDK
Watch Video play_circleCheckout how to update the ByteBrew SDK by watching our short 1 minute tutorial video or following the steps below:
Remove the older ByteBrew SDK
Import the new ByteBrew SDK you're upgrading to.
Select ByteBrew Setting by clicking (1) Window, then (2) ByteBrew in the dropdown, then finally (3) select ByteBrew Settings
Re-input your SDK Keys for your game.
SDK FAQs
Check to make sure that you've re-inputted your Game IDs and SDK Keys after updating the ByteBrew SDK.
ByteBrew has standardized events that are automatically tracked such as: install events and session events. These events are used throughout the platform to automatically calculate out-of-the-box metrics like: session length, playtime, retention and more.
Here are several reasons ByteBrew does not cache offline player data such as:
(1) App File Size: For games tracking many parts of their apps, users playing offline will generate a significant file size of cached data that will inflate the app size on the device.
(2) Reduce App Crashes: If the storage of offline data becomes too large, the device will not be able to open the app on lower end devices and cause a potential app crash. ByteBrew is designed to make sure those issues do not exist for your game.
(3) Data Accuracy Tampering: Cached data from historical game session will get uploaded into the system the next time the user comes back online. This mean malicious users can tamper with your app's data, leading to potential issues with accurate reporting for you to operate from.
If you're receiving a 401 Error in your game code, re-confirm that you have correctly inputting all your game's information including: SDK Key, Game IDs, and Bundle ID.
If you see a NoClassDefFoundError for a third party library (like Google Advertising ID), then use the External Dependency force resolve. However, if the class that is missing is a ByteBrew class, then check your ProGaurd settings.
If you track custom events in the same scene you initialize the ByteBrew SDK, then there is a chance your custom events wont get tracked as the SDK might not be finished initializing. To solve this, use the Initialization callback in the SDK to determine when the SDK has finished initialization before tracking custom events.
If you call for remote configs within the same scene you initialize the ByteBrew SDK, then there is a chance your remote configs wont get loaded as the SDK might not be finished initializing. To solve this, use the Initialization callback in the SDK to determine when the SDK has finished initialization before calling remote configs.
ByteBrew supports Android 5.1 and above & iOS version 9.0 and above.
No, you can only use one push notification service or provider to send notifications at one time. However, if you are only using ByteBrew for our other services, then you can use another platform's push notifications SDK while still using ByteBrew SDK without any issues.
No, Push Notifications has it's own internal callback, so no other callback is necessary.
API Level 22 (Android 5.1)
A/B Tests deliver configs using your Remote Configs integration. Remote Configs delivered in milliseconds to your players after the ByteBrew SDK is initialized.
No, all events that can be sent to ByteBrew are only from our SDK.
As a first step, always check to confirm you're using the Purchase Validation Code that includes the Callback function. If you confirmed you are utilizing the purchase validation method with the callback, check for and remove any package, system, or code in your project that truncates or shortens your project's code base. These systems can remove code that ByteBrew requires to operate the validation process.
Yes, whether tracking in-app purchases or using Custom Events that send revenue parameters, the revenue you send should be in USD.
Yes! Use this integration page to see how to integrate ByteBrew with your Unity Web Game.
No, ByteBrew Ads currently only supports Interstitial and Reward Video ads.
Yes, under the Ad Unit settings you can add a frequency cap per session.
ByteBrew Ads is powered by Ctrl, our AI behavior engine that predicts user LTV and retention in real time.
ALT selects the creative with the highest likelihood to engage for every user.
To get a mature test for new campaigns it's best to set a two week minimum.
Yes, over the first week your new campaign is learning the campaign targets you set.
To launch Ctrl campaigns you must have both in-app purchase validation and ad event tracking integrated in your app.
ByteBrew Ads is a self-attributing network that utilizes our platform's native attribution systems to track converting installs. This feature is completely free and does not require any additional costs.
No, ByteBrew Ads is a self-attributing network that utilizes our platform's native attribution systems to track converting installs. This feature is completely free and does not require any additional costs.
ByteBrew Ads will only attribute users who consent to tracking to adhere with all platform guidelines.
Ctrl is ByteBrew's AI behavioral targeting engine powering ByteBrew Ads; delivering smarter acquisition decisions in real-time to maximize your marketing performance.
Alt is ByteBrew's AI vision engine developed to dynamically serve creatives in your campaign most likely to drive engagement.
Find Test Ad Units you can use on the Ad Units docs page here.