Godot SDK Integration
Watch Video play_circleFollow the steps below to integrate the ByteBrew SDK or watch the tutorial video for a step by step walkthrough:
Import ByteBrew Godot Package to your project
Extract the contents of the Android folder from the zip:
ByteBrew.gdap
bytebrew_godot.release.aar
Place the two files listed above in your project file path res://android/plugins. If you dont have this path, then create it in the root of your project file.
Extract the contents of the iOS folder from the zip:
ByteBrew folder
Place the folder listed above in your project file path res://ios/plugins. If you dont have this path, then create it in the root of your project file.
Enable ByteBrew in Project
Follow these steps to enable ByteBrew in Project:
Go to Project
Then Export, and select your Android export settings.
Scroll down to the Plugins section and enable ByteBrew by checking it.
Then Export, and select your iOS export settings.
Scroll down to the Plugins section and enable ByteBrew by checking it.
Add AutoLoad script
Follow these steps to add a AutoLoad ByteBrew script in the Project:
Go to Project Settings
Then AutoLoad, and select your path folder button.
Find the res://ios/plugins/ByteBrew folder and select the ByteBrewEntry.gd script.
Then select Add, to your new AutoLoad Node.
Go to your ByteBrew Dashboard
Go to your Game Settings page on the ByteBrew dashboard and locate your game keys listed on the dashboard. After finding your Game IDs and SDK Key, copy them.
Initialize ByteBrew
Initialize ByteBrew using the code below at the first scene of your game to start capturing sessions and events.
Inside the initialization, input the Game ID and SDK Key from the ByteBrew dashboard into the parameters of the ByteBrew initialization.
                                var ByteBrew

                                func _ready():
                                    if Engine.has_singleton("ByteBrew"):
                                        ByteBrew = Engine.get_singleton("ByteBrew")
                                        //You must make sure add the last two parametes the Godot Version and your current version of your project so you can get deep cohort analytics.
                                        if OS.get_name() == "Android":
                                            ByteBrew.InitializeByteBrew("ANDROID GAME ID", "ANDROID GAME KEY", Engine.get_version_info(), "YOUR GAME VERSION HERE ex(0.0.1)")
                                        elif OS.get_name() == "iOS":
                                            ByteBrew.InitializeByteBrew("IOS GAME ID", "IOS GAME KEY", Engine.get_version_info(), "YOUR GAME VERSION HERE ex(0.0.1)")
Exporting Android Requirements
ByteBrew requires the following implementation for Android:
Play Services Ads Identifier
We have already added requirements in the settings to add this implementation.
Exporting iOS Requirements
To export for iOS, ByteBrew requires the following three (3) iOS Frameworks:
Security.Framework
AdServices.Framework
AdSupport.Framework
Each of these listed frameworks should be implemented in your final xcode project as frameworks.
Custom Events Tracking
Custom Events in ByteBrew enable you to deep dive across all of our extensive analytics dashboards. Continue below to learn how to integrate custom events.
Custom Events on ByteBrew allow for an unlimited number of key_name=value; sub-parameters under the custom event. For example, you can have a custom event called “level” that has a subparameter under the event named “levelnumber” and the values of that Level Number subparameter could be “1, 2, 3, 4, 5, etc.”. Additionally you could add in other subparameters for attributes inside the levels of your game, such as "powerups", to show the different equipment used in levels with parameter values "fireball, revive, doublepoints, etc.". The world is your oyster with custom events, so build as complex of an event system as you need for your game. To illustrate our custom event structure visually, see the following diagram:
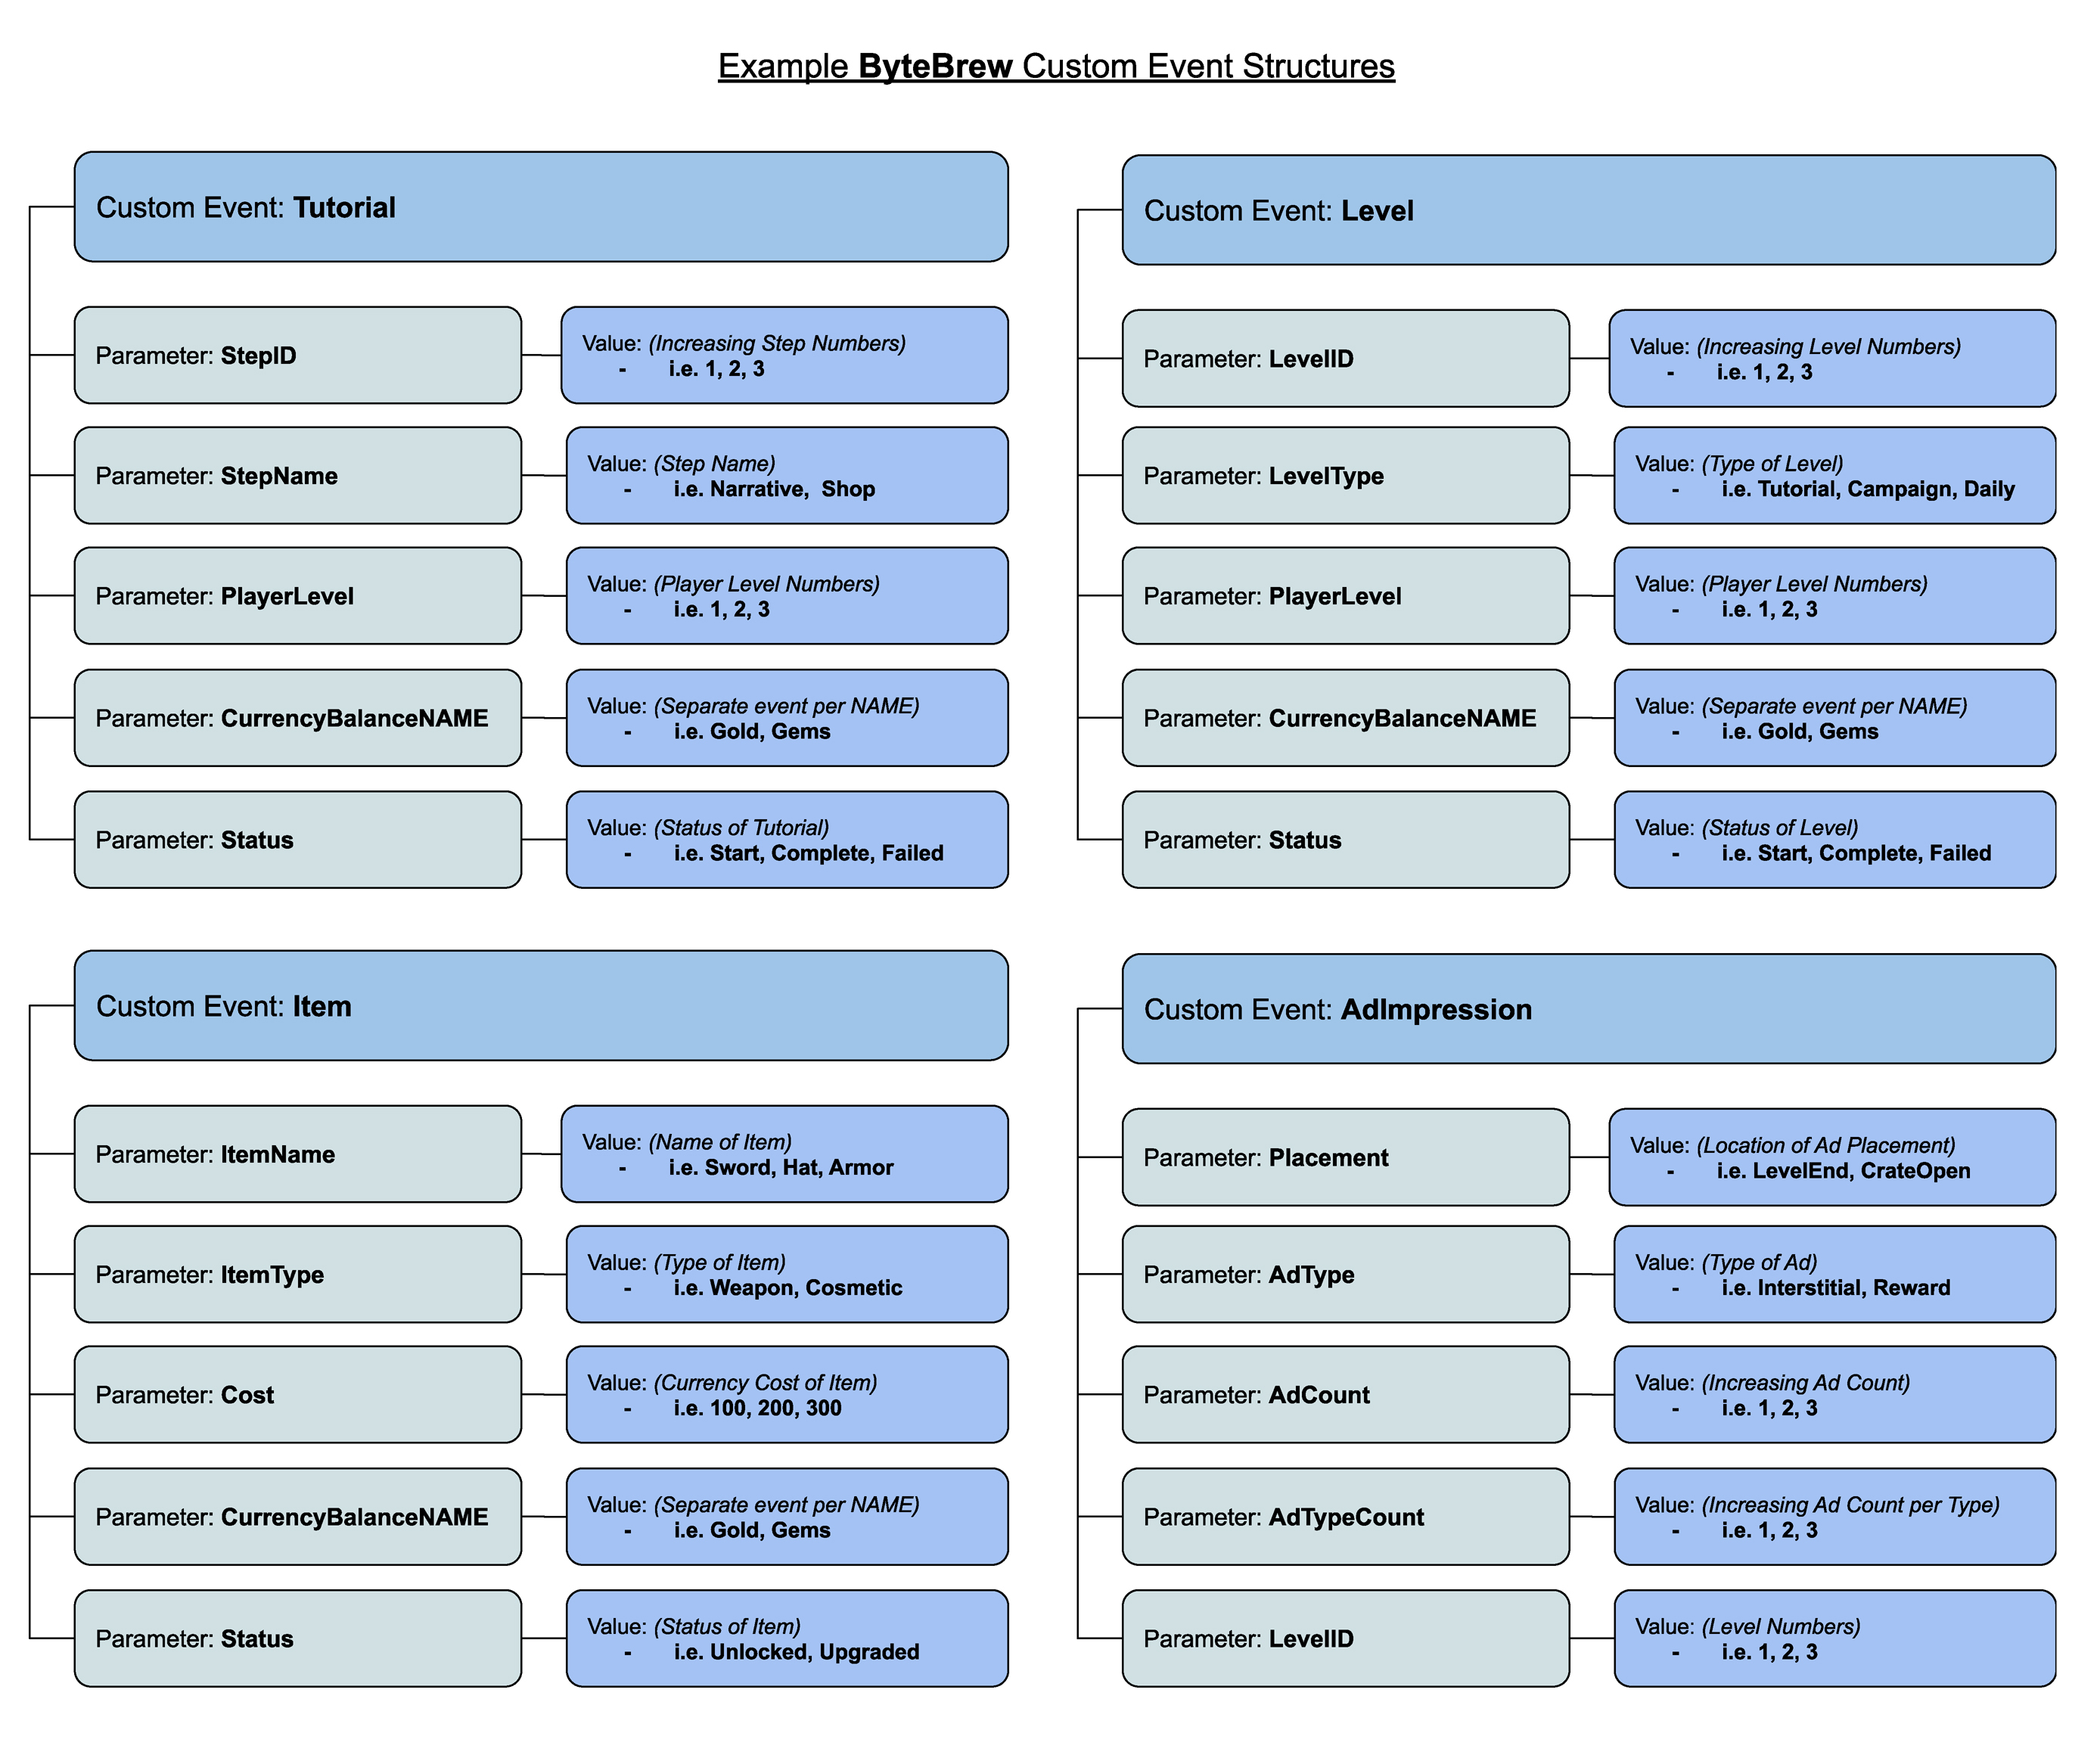
Custom Events
See samples below to see how to code Custom Events:
Custom event names and parameters that include special characters will not be processed on the dashboard. These events are unrecognized by ByteBrew and antipattern to ByteBrew's event structure.
Basic Custom Event:
                                    //Basic Custom Event without any sub-parameters
                                    ByteBrew.NewCustomEvent("eventName")

                                    //Basic Custom Event with a sub-parameter
                                    ByteBrew.NewCustomEventWithStringValue("CustomEventName", "key_name=value;")

                                    //Examples
                                    ByteBrew.NewCustomEventWithStringValue("GamePurchaseVC", "currency=GOLD;amount=500;character=viking;")
                                    ByteBrew.NewCustomEventWithStringValue("LevelCompleted", "level=25;character=viking;")
Custom Event Tracking Method:
                                //Key Value format "key_name=value;"
                                //Custom Events can take multiple pairs, "key_name1=value1;key_name2=value2;key_name3=value3;"
                                ByteBrew.NewCustomEventWithStringValue("level_started", "weapon=megablaster;powerup=extralife;")
Remote Configs & A/B Tests
Remote Configs allow you to make updates to your app remotely without having to update your game's app store. Adding remote configs to your games are a fantastic way to be agile and send updates or patches to players instantly. Remote Configs are also utilized for creating A/B Tests on the platform.
When planning to integrate Remote Configs, We recommend implementing remote configs throughout all parts of your game to allow you to tweak and tune as you analyze your game performance data. See how to implement remote configs in your game by following the steps below:
Loading the Remote Configs
To use Remote Configs, you must first call for the config to get updated. You can call the below code whenever you want to update the configs:
                                //Call the loader to update configs
                                ByteBrew.LoadRemoteConfigs()

                                //Check if the remote configs are ready and set
                                ByteBrew.HasRemoteConfigsBeenSet()
You can grab A/B Test keys and values using this method:
                                //Call to get the key specific value and if the key doesn't exist it will return the default variable specified, like if the AB test user is in the control group
                                var configValue = ByteBrew.RetrieveRemoteConfigValue("KEY", "DEFAULT VALUE IF NOT AVAILABLE")
Push Notifications
Watch Video play_circleUsing ByteBrew you can send cross-platform push notifications to your players around the globe. To get started with push notifications follow the steps below or watch the tutorial video series.
Integrate Push Notifications
Integrating Push Notifications with ByteBrew is super simple and only requires one line of code after initializing the ByteBrew SDK. See the Push Notification integration code line below:
ByteBrew.StartPushNotifications()
Create Push Notification App on the ByteBrew Dashboard
Go to the Push Notification dashboard on ByteBrew and create a new Push Notification App. See our Push Notification Dashboard documentation for step by step walkthroughs about this.
Push Notification Extra Settings (Optional Android Only)
Add a Custom Small Icon and Large Icon for push notifications.
Push Notification Android Manifest (Required Android Only)
<uses-permission android:name="android.permission.POST_NOTIFICATIONS"/>
Push Notification Xcode Export Additions (Required iOS Only)
For sending notifications to iOS devices, follow the additional required steps below on Xcode:
Add UserNotifications.framework
Add UserNotifications.framework to the frameworks and libraries in Xcode.
Add Capabilities
Press "+ Capability" and add the following capabilities listed in steps 3 and 4 below.

Add "Background Modes" and under that section, checkmark "Remote Notifications
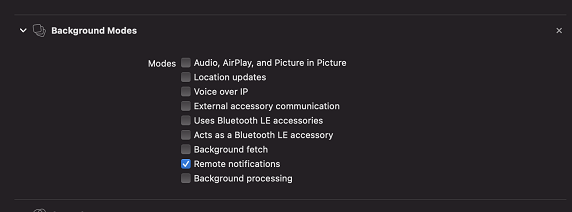
Add "Push Notifications"

Track Purchases
In ByteBrew SDK you can track all your game or apps in-app purchases to analyze your monetization performance on the dashboard. There are two ways to track purchases on ByteBrew. The first way is to use basic in-app purchase events. The second way is to use our real-time server-side purchase validation to validate real purchases vs. fraudulent transactions.
Track Basic In-App Purchases
To track in-app purchases in your game, use the below method:
ByteBrew.TrackInAppPurchaseEvent("Apple App Store", "USD", float(amount), "currencyPack01", "Currencies")
Track Validated Purchases
On ByteBrew, we offer a real-time server-side purchase validation to stop purchase fraud from client-side purchase receipt tampering that takes place in mobile games and apps.To track validated in-app purchases utilize the following platform specific method:
                                //JSON Format ex. string json = "{\"firstname\":\"john\", \"lastname\":\"doe\",\"age\":30}";

                                //Retrieve the Android receipt and Signature from the purchase event that occurs. We will validate it server side so you can view valid purchases in you dashboard.
                                var googleReciept = "..."
                                var googleSignature = "..."
                                ByteBrew.TrackGoogleInAppPurchaseEvent("Google Play Store", "USD", float(amount), "currencyPack01", "Currencies", googleReciept, googleSignature)
Ad Tracking Event
Using ByteBrew you can track your game's or app's ad events. Tracking Ad Events will enable you to see breakdowns of your ads in the monetization dashboard. See the code snippets below to learn how to track ad events:
                                // Record the Placement Type, Location of the placement, ad unit ID, and Network (Recommended)
                                ByteBrew.TrackAdEventWithAllOptions("Interstitial", "EndOfLevel", "3253k3302-3r3j4i343-3nij343-405403", "AdMob")

                                //Some ad event paramters can be ommited like so
                                ByteBrew.TrackAdEvent("Interstitial", "EndOfLevel")
                                ByteBrew.TrackAdEventWithAdID("Interstitial", "EndOfLevel", "3253k3302-3r3j4i343-3nij343-405403")
Data Attributes
Data Attributes are tags in the SDK that you can give a user to define them for live ops functions. For example, you can use Data Attributes to tag user to build player segments to send targeted remote configs and push notifications. If you are looking to tag users for tracking and filtering, then use Custom Events with subparamters to track that type of update. See the following code snippets for examples on how to use Data Attributes:
                                ByteBrew.SetCustomDataWithStringValue("username", "michael_scarn")
                                ByteBrew.SetCustomDataWithDoubleValue("total_hitpoints", 68.7)
                                ByteBrew.SetCustomDataWithIntegerValue("dundees", 3)
                                ByteBrew.SetCustomDataWithBooleanValue("loves_the_office", true)
Get User ID
GetUserID method in the SDK enables you to grab the current User ID of the user in your game. This is a handy method for finding the ID for a user you want to send a specific push notification to.
                                // Get the string userID
                                ByteBrew.GetUserID()
Stop Tracking Current User
In the ByteBrew SDK, you have the option to stop tracking any user in your game by calling the ByteBrew StopTracking method. This will immediately stop and disable any tracking for a user. As another alternative method to disabling tracking, you can build your own consent pop-up prompt screen in your game or app and delay the initialization of ByteBrew SDK until your user has consented/agreed to your prompt.
ByteBrew.StopTracking();
SDK FAQs
ByteBrew has standardized events that are automatically tracked such as: install events and session events. These events are used throughout the platform to automatically calculate out-of-the-box metrics like: session length, playtime, retention and more.
here are several reasons ByteBrew does not cache offline player data such as:
(1) App File Size: For games tracking many parts of their apps, users playing offline will generate a significant file size of cached data that will inflate the app size on the device.
(2) Reduce App Crashes: If the storage of offline data becomes too large, the device will not be able to open the app on lower end devices and cause a potential app crash. ByteBrew is designed to make sure those issues do not exist for your game.
(3) Data Accuracy Tampering: Cached data from historical game session will get uploaded into the system the next time the user comes back online. This mean malicious users can tamper with your app's data, leading to potential issues with accurate reporting for you to operate from.
ByteBrew supports Android 5.1 and above.
No, you can only use one push notification service or provider to send notifications at one time. However, if you are only using ByteBrew for our other services, then you can use another platform's push notifications SDK while still using ByteBrew SDK without any issues.
No, Push Notifications has it's own internal callback, so no other callback is necessary.
API Level 22 (Android 5.1)
A/B Tests deliver configs using your Remote Configs integration. Remote Configs delivered in milliseconds to your players after the ByteBrew SDK is initialized.
Yes, whether tracking in-app purchases or using Custom Events that send revenue parameters, the revenue you send should be in USD.