Javascript SDK Integration
Follow the steps below to integrate the ByteBrew SDK or watch the tutorial video for a step by step walkthrough:
Import ByteBrew Javascript SDK
Install the ByteBrew Web SDK dependency to your project. You can find the ByteBrew SDK on npm.
npm install bytebrew-web-sdk
Go to your ByteBrew Dashboard
Go to your Game Settings page on the ByteBrew dashboard and locate your Web app keys listed on the dashboard. After finding your app keys, copy them.
Initialize ByteBrew with App Keys
Initialize ByteBrew using the code below at the beginning of your game to start capturing sessions and events.
Split the initialization by platform and input the corresponding app keys from the ByteBrew dashboard into their parameter fields.
                                import { ByteBrew } from "bytebrew-web-sdk";

                                // ...

                                // Initialize the ByteBrew SDK
                                ByteBrew.initializeByteBrew('WEB_APP_ID', 'WEB_SDK_KEY', 'APP_VERSION_HERE');
Custom Events Tracking
Custom Events in ByteBrew enable you to deep dive across all of our extensive analytics dashboards. Continue below to learn how to integrate custom events.
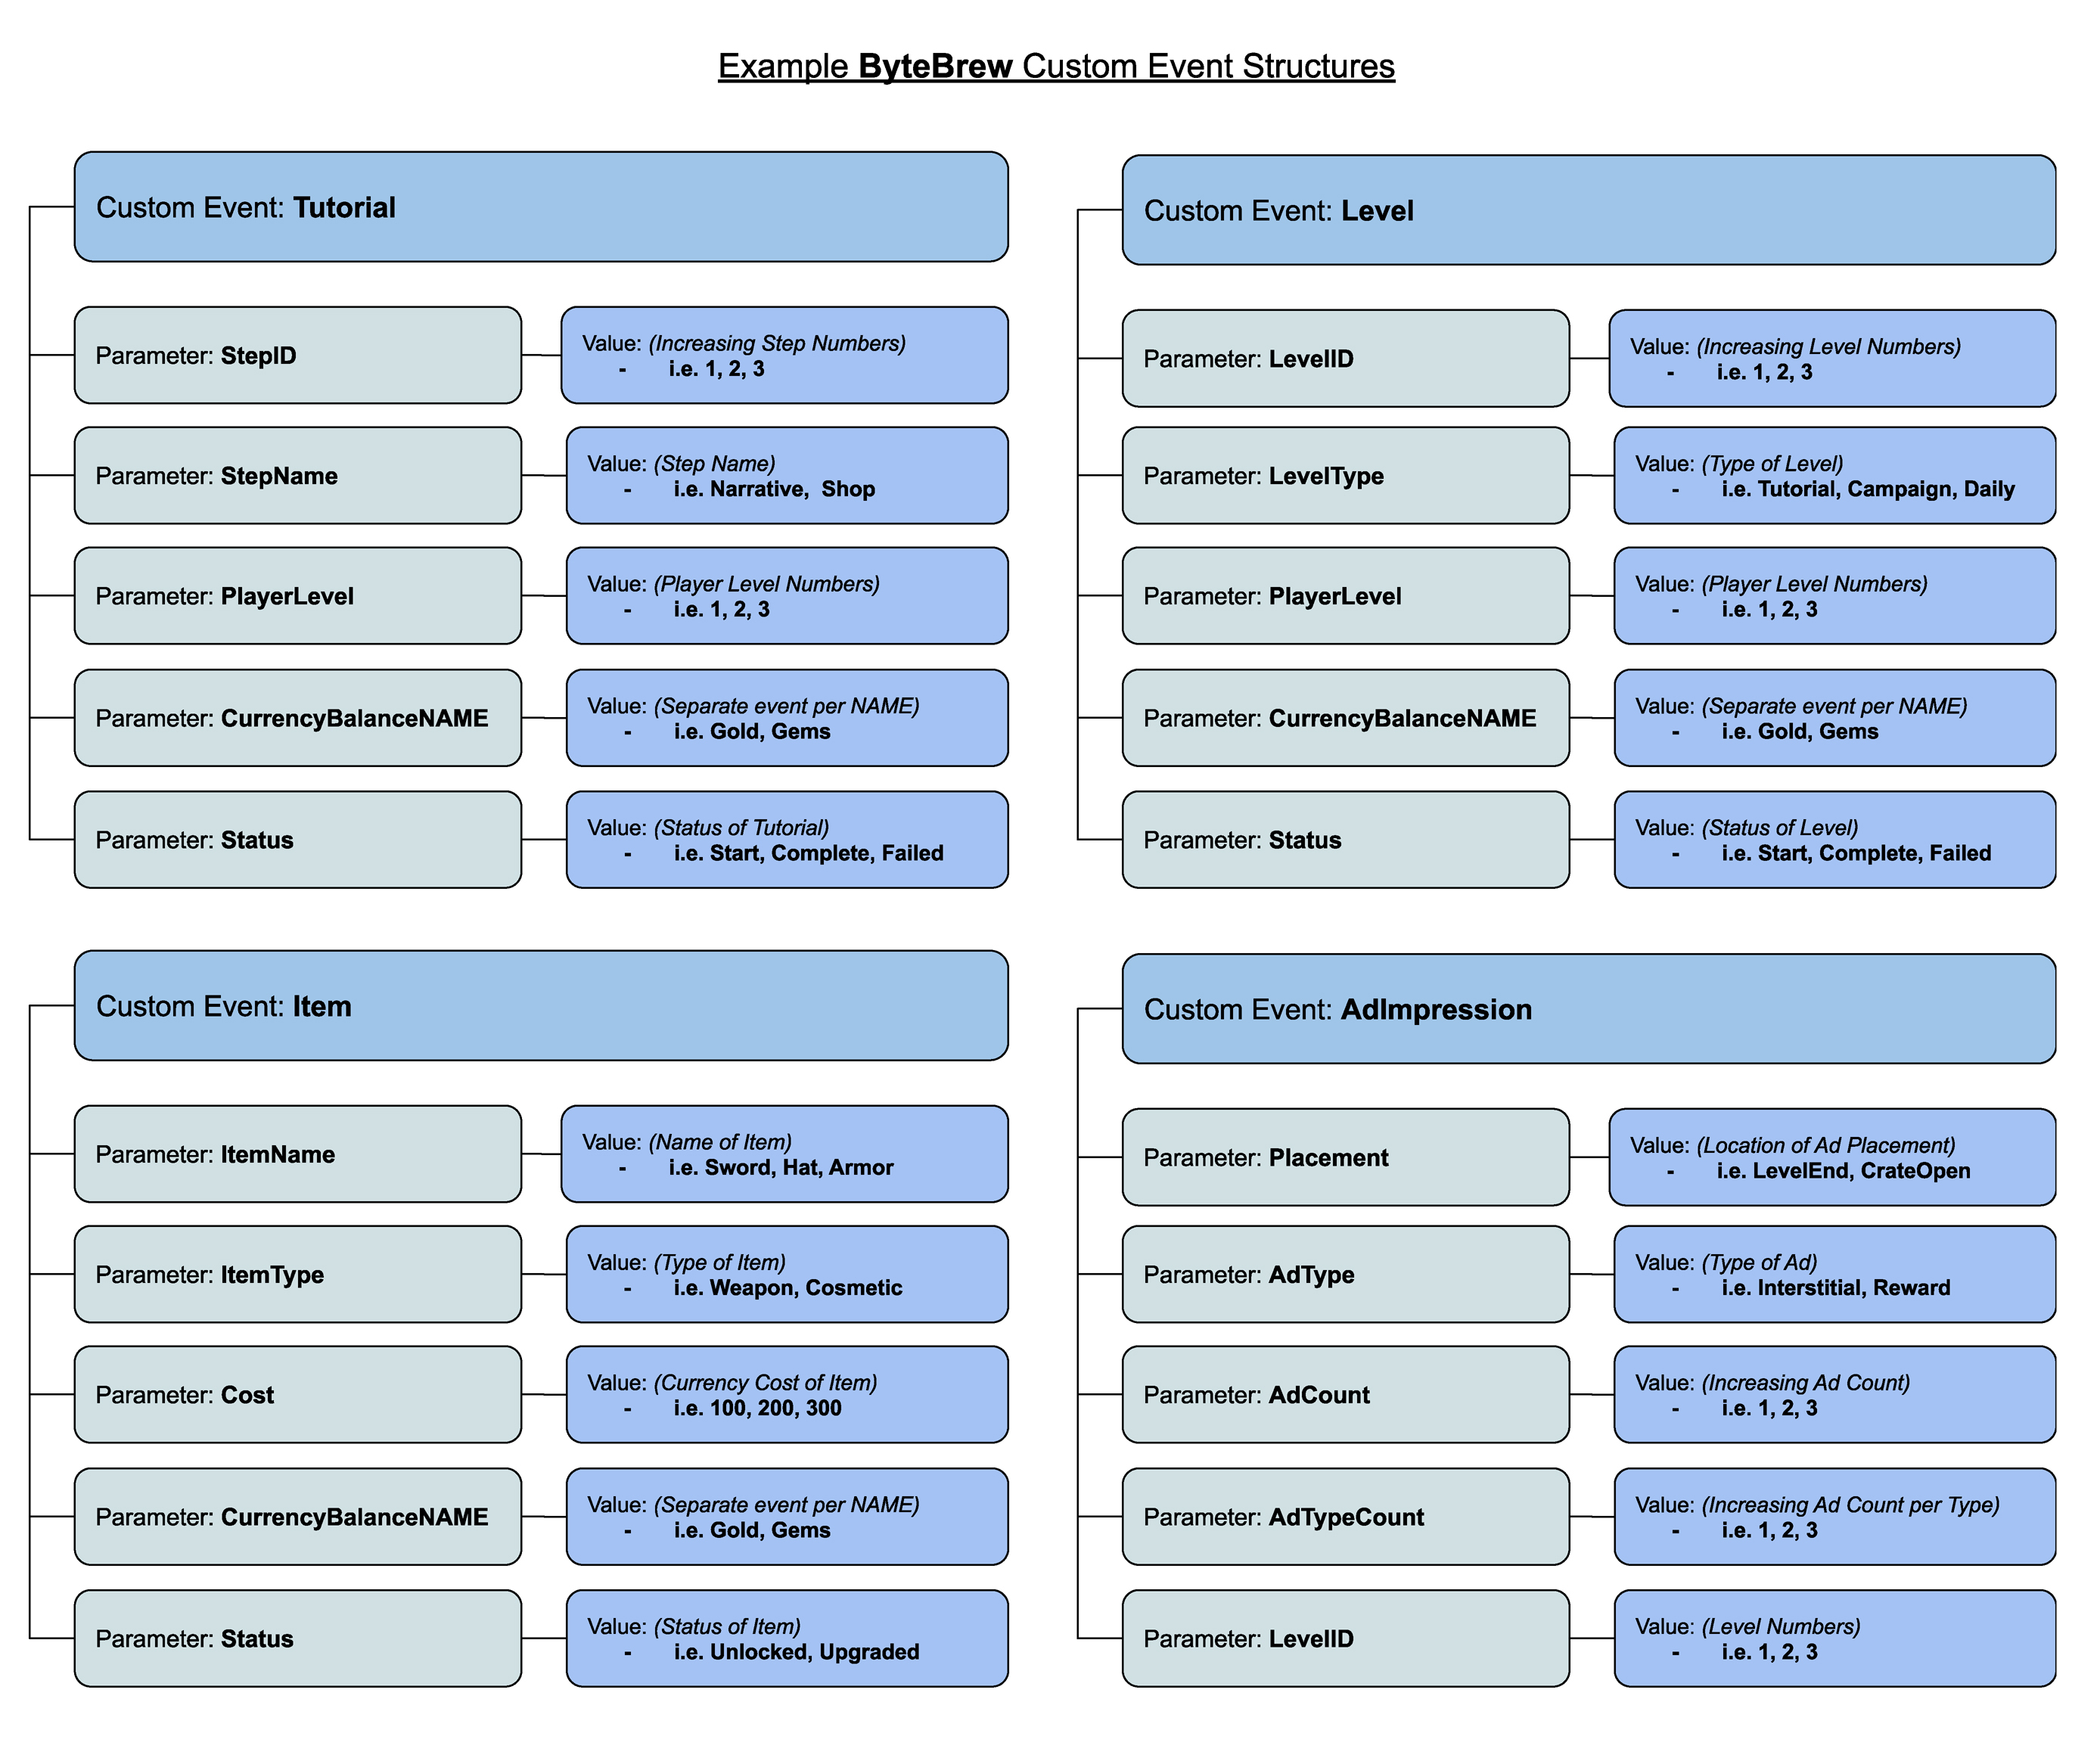
Custom Events on ByteBrew allow for an unlimited number of key_name=value; sub-parameters under the custom event. For example, you can have a custom event called “level” that has a subparameter under the event named “levelnumber” and the values of that Level Number subparameter could be “1, 2, 3, 4, 5, etc.”. Additionally you could add in other subparameters for attributes inside the levels of your game, such as "powerups", to show the different equipment used in levels with parameter values "fireball, revive, doublepoints, etc.". The world is your oyster with custom events, so build as complex of an event system as you need for your game. To illustrate our custom event structure visually, see the following diagram:
Custom Events
See samples below to see how to code Custom Events:
Custom event names and parameters that include special characters will not be processed on the dashboard. These events are unrecognized by ByteBrew and antipattern to ByteBrew's event structure.
Basic Custom Event:
                                    //Basic Custom Event without any sub-parameters
                                    ByteBrew.newCustomEvent("eventName");

                                    //Basic Custom Event with a sub-parameter
                                    ByteBrew.newCustomEvent("test_sub_param_event", { "test_key": "HelloWorld" });
Dictionary Custom Event Tracking Method:
To easily add additional custom sub-parameters to an event with a dictionary/object method using with key & value pairs shown below:
                                //Custom Events can take multiple pairs, {"key_name1": "value1", "key_name2": "value2", "key_name3": "value3"}

                                //Examples
                                ByteBrew.newCustomEvent("GamePurchaseVC", {
                                    "currency": "GOLD",
                                    "amount": "500",
                                    "character": "viking"
                                });

                                ByteBrew.newCustomEvent("LevelCompleted", {
                                    "level": "25",
                                    "character": "viking"
                                });
Remote Configs & A/B Tests
Remote Configs allow you to make updates to your app remotely without having to update your game's app store. Adding remote configs to your games are a fantastic way to be agile and send updates or patches to players instantly. Remote Configs are also utilized for creating A/B Tests on the platform.
When planning to integrate Remote Configs, We recommend implementing remote configs throughout all parts of your game to allow you to tweak and tune as you analyze your game performance data. See how to implement remote configs in your game by following the steps below:
Loading the Remote Configs
To use Remote Configs, you must first call for the config to get updated. You can call the below code whenever you want to update the configs:
                                    //Call the Action handler
                                    ByteBrew.loadRemoteConfigs((configResponse) => {
                                        console.log(configResponse);
                                    });

                                    //Check if the remote configs are ready and set
                                    var hasSet = ByteBrew.hasRemoteConfigsBeenSet();
Retrieve the Configs
Once the action handler has finished, you can call the remote config method below:
                                //Call to get the key specific value and if the key doesn't exist it will return the default variable specified, like if the AB test user is in the control group
                                var config = ByteBrew.retreiveRemoteConfigValue("test_key", "test_default");
Get User ID
GetUserID method in the SDK enables you to grab the current User ID of the user in your game. This is a handy method for finding the ID for a user you want to send a specific push notification to.
                                // Get the string userID
                                var user_id = ByteBrew.getUserID();
Stop Tracking Current User
In the ByteBrew SDK, you have the option to stop tracking any user in your game by calling the ByteBrew StopTracking method. This will immediately stop and disable any tracking for a user. As another alternative method to disabling tracking, you can build your own consent pop-up prompt screen in your game or app and delay the initialization of ByteBrew SDK until your user has consented/agreed to your prompt.
ByteBrew.stopTracking();
SDK FAQs
A/B Tests deliver configs using your Remote Configs integration. Remote Configs delivered in milliseconds to your players after the ByteBrew SDK is initialized.
No, all events that can be sent to ByteBrew are only from our SDK.
Yes, for tracking revenue sources with custom event subparameters the revenue should be in USD.
Neither GameID or SDK Key should be seen publicly. But due to the nature of web and client side SDKs, this cannot be prevented. There are several ways to better hide your IDs/Keys from anyone malicious by obfuscating your code or sending keys server-side through environment variables.